
If you’re planning an accessory dwelling unit, a builder site survey is the on-site visit that checks setbacks, utility capacity, grading, and access before anyone draws a design or files a permit. Get one whenever zoning is unclear, the lot has slopes or easements, or you’re committing six figures to construction. If your lot is flat, rectangular, and clearly zoned for an ADU, a self-check might be all you need before calling a builder.
TL;DR:
- A builder-conducted site survey verifies setbacks, utility capacity, soil conditions, and access to determine if the lot can support an ADU legally and physically.
- The survey must include parcel data, setback lines, easements, lot coverage, utility specifications, property corners, and access routes to avoid delaying permit approval.
- Costs and timelines vary depending on site complexity, with typical assessments taking one to three weeks and charges covering the visit, specialists, boundary surveys, or soil analysis.
- Common issues flagged include insufficient electrical capacity, conflicting septic lines, and narrow access paths, which may require upgrades or redesigns.
- A thorough feasibility survey informs the design, flags legal restrictions like easements, and reduces costly revisions, making it a crucial first step before detailed site planning.
Table of Contents
- What a Builder-Conducted ADU Site Survey Covers
- Builder Site-Survey Checklist: What the Crew Records
- Preparing Your Property for the Site Visit
- How Long a Site Survey Takes and What It Costs
- Red Flags a Site Survey Often Catches
- How Live Large™ Runs Site Surveys
- Feasibility Study vs. Permit-Ready Site Plan: What’s the Difference
- Easements, Right-of-Way, and Other Legal Snags
- Why the Site Survey Deserves More Weight Than It Gets
- Ready to Schedule Your Site-Visit Assessment?
- Sources
What a Builder-Conducted ADU Site Survey Covers
A professional ADU feasibility study is really several smaller checks bundled into one visit. The builder isn’t there to sell you a floor plan yet. They’re there to find out whether your lot can legally and physically support one, and where.
The process usually starts before anyone shows up, with a zoning eligibility check pulled from your city or county’s GIS portal or a quick call to planning staff. From there, the site visit itself covers a handful of core items:
- Buildable envelope mapping: measuring setbacks, easements, and lot coverage limits to define exactly where an ADU can legally sit
- Utility capacity: checking electrical panel amperage, water and sewer or septic connections, gas lines, and where new service would tie in
- Topography and soil: noting slopes, drainage patterns, and soil conditions that could limit foundation type or add site work costs
- Access constraints: confirming whether machinery and delivery trucks can actually reach the build zone
The deliverable that comes out the other end typically includes annotated photos, a sketch of the buildable envelope, written feasibility findings, and a rough permit timeline estimate. That last piece matters more than most homeowners expect. A lot that looks fine on paper can still take months longer to permit if the jurisdiction requires extra review for slope, tree canopy, or historic overlays.
Builder Site-Survey Checklist: What the Crew Records
Whether you’re comparing quotes from different builders or just want to know what a thorough visit should produce, use this as your baseline. A survey that skips several of these items is a survey that leaves gaps for a permit reviewer to find later.
- Parcel data and zoning designation. Pull this from the county assessor or GIS site before the visit if you can, so the builder can confirm rather than start from zero.
- Setback lines from all four property boundaries. These determine your buildable envelope more than almost anything else on the lot.
- Easements and rights-of-way. Utility easements, drainage easements, and shared driveways can quietly eliminate the spot you had in mind.
- Lot coverage math. Many jurisdictions cap total structure footprint as a percentage of lot size, and an existing garage or shed can eat into that allowance fast.
- Electrical panel label and amperage. A panel with lower amperage serving the main house often can’t support a new ADU without an upgrade.
- Water meter size and sewer cleanout location, or septic tank and drain field location if you’re not on municipal sewer.
- Photos with a north arrow and any recorded property corners, plus a sketch of the access route for construction equipment.
If boundary lines are unclear or a neighbor disputes where your property actually ends, that’s the one scenario where you loop in a licensed surveyor rather than relying on the builder’s tape measure. Otherwise, a civil engineer and an electrician are the two specialists worth having on call if the initial visit flags anything unusual.
Pro Tip: Ask the builder to photograph the electrical panel’s label plate up close, not just the panel box. That plate lists the exact amperage and breaker configuration an electrician needs to quote a service upgrade, and it saves a second site visit later.

Preparing Your Property for the Site Visit
A little prep turns a two-hour visit into a ninety-minute one, and it keeps the findings sharper. Gather what you have first: any existing plat or survey, your county assessor’s parcel printout, HOA covenants if they apply, and recent utility bills that show meter sizes or service type.
Physically, that means unlocking gates, securing pets somewhere other than the yard, and clearing a path to the areas the builder needs to walk, including the electrical panel and any water or sewer access points. If you have a rough idea where you’d want the ADU placed, flag it, even with a stake or a chalk mark, so the builder can assess that specific spot rather than the whole lot generically.
While they’re there, ask directly about permit risks specific to your jurisdiction, what utility upgrades are likely, and a realistic timeline range. A feasibility check you run yourself beforehand, using free county GIS tools and printed setback rules, can also help you ask sharper questions once the professional shows up.
How Long a Site Survey Takes and What It Costs
Most feasibility assessments run one to three weeks from initial contact to written findings, though that window stretches if the site visit needs to be scheduled around specialist consults or if the jurisdiction is slow to respond to preliminary planning questions.
Expect a few distinct cost line items rather than one flat number:
- A base site-visit fee covering the builder’s time, measurements, and written report
- Specialist consults if the panel, sewer, or septic situation looks borderline (electrician or plumber walk-through)
- A formal boundary survey, only if property corners are missing or disputed
- Engineering input if soil or slope conditions raise foundation questions
A self-assessment using free checklists can be enough for a straightforward, flat, clearly zoned lot. Once you’re looking at real construction spending, self-checks stop being sufficient and a professional visit earns its cost.
Red Flags a Site Survey Often Catches
The most common surprises are electrical panels without enough capacity for a second dwelling, sewer or septic lines that run through the exact spot you wanted to build, and access paths too narrow for construction equipment. Each one hits differently: a panel upgrade adds a permit and a few thousand dollars, a septic conflict might force a redesign of the entire footprint, and a blocked access route can mean hand-digging a foundation instead of using machinery, which slows everything down.
None of these are automatic deal-breakers. They’re decision points. A panel upgrade or a repositioned ADU usually lets the project proceed; a septic system with no room to relocate might mean the lot needs a smaller unit or a different placement entirely.
How Live Large™ Runs Site Surveys
Live Large™ builds the site visit into the front end of every project, not as a separate add-on. Our crews check the same core items covered above, then translate the findings into something you can actually act on:
- A buildable envelope sketch you can hand to a designer immediately
- Written feasibility findings that flag utility, access, or setback issues before they become budget surprises
- A permit timeline estimate specific to your jurisdiction
What separates a useful survey from a rushed one is what happens after it. Live Large™ carries survey findings straight into permit-ready site plans and connects you with financing options, including HELOC assistance, so there’s no gap between “here’s what your lot can support” and “here’s how to build it.”
Feasibility Study vs. Permit-Ready Site Plan: What’s the Difference
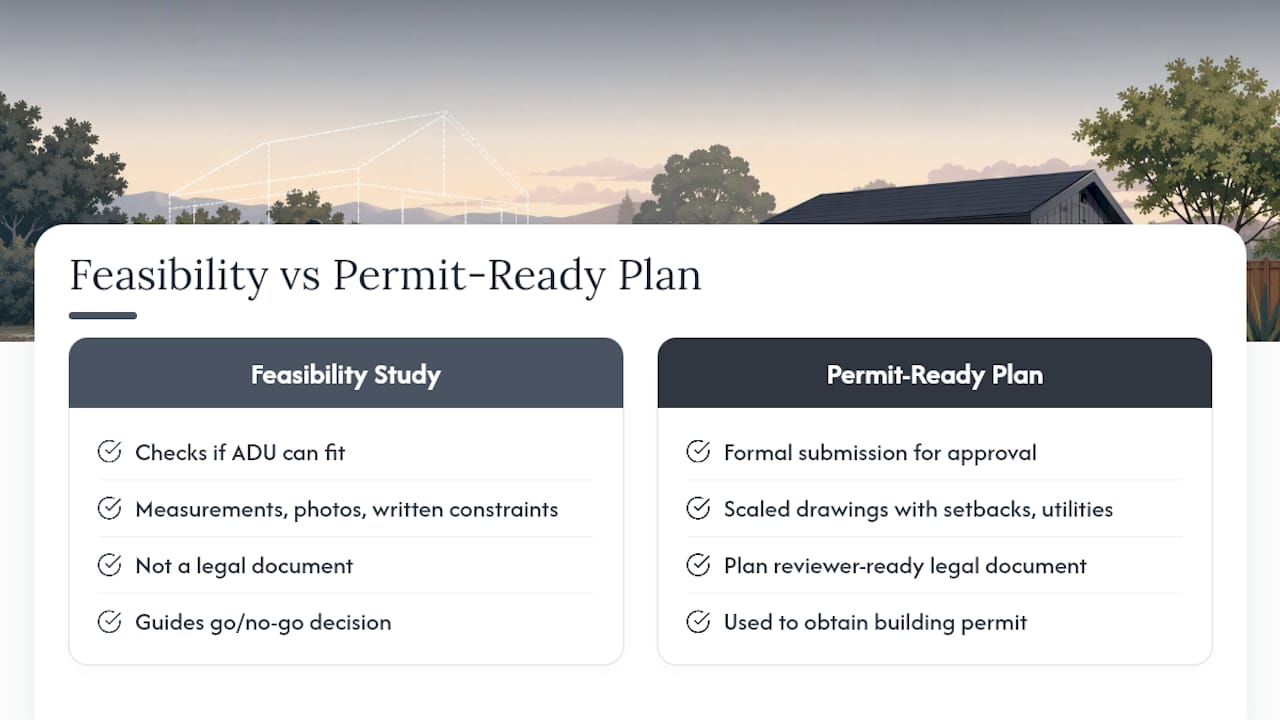
A feasibility study and a permit-ready site plan answer two different questions, and confusing them causes real delays.
The feasibility survey answers: can an ADU go here, and roughly where? It’s a snapshot, built from measurements, photos, and a written summary of constraints. It’s not a legal document a building department will stamp and approve. Think of it as the diligence phase, the step that tells you whether to spend money on design at all.
A permit-ready site plan is a formal drawing showing property boundaries, existing structures, the proposed ADU with setbacks labeled precisely, utility connections, lot coverage calculations, and access routes, all drawn to scale and ready for a plan reviewer to check against code. It’s the document that actually gets submitted.
The jump between the two is where most delays happen. Missing parking calculations, wrong setback numbers, or omitted utility connections are the most common reasons a submitted plan bounces back for corrections, and they’re exactly the details a good feasibility survey should have already flagged. Skipping the survey and going straight to a site plan doesn’t save time. It usually just moves the problems downstream, where they cost more to fix.
Easements, Right-of-Way, and Other Legal Snags
Easements are the legal issue that trips up more ADU projects than zoning itself. A utility easement running across your backyard doesn’t show up as a fence or a visible line. It’s a recorded right, often decades old, that lets a utility company or neighboring property access part of your land regardless of what you’d like to build there.
Right-of-way strips along the street frontage are another common surprise. Some jurisdictions technically own a few extra feet beyond what looks like the sidewalk, and that strip counts against your setback calculations even though it looks like part of your yard.
Shared driveway agreements and drainage easements fall into the same category: legally binding, rarely obvious from a walk-through, and usually only found by pulling the recorded plat or title documents. This is precisely why a feasibility survey checks recorded documents rather than relying on a visual walk of the property line. If your lot has any history of subdivision, inherited ownership, or a shared access point with a neighbor, ask the builder directly whether they pulled title or plat records as part of the visit. If they didn’t, and the lot has any of those histories, that’s worth a conversation with a real estate attorney before you spend money on design.
Why the Site Survey Deserves More Weight Than It Gets
Most ADU advice online treats the site survey as a formality, a box to check before the “real” work of design and permitting begins. That’s backward. The survey is where the real decisions get made, and treating it as a rubber stamp is how homeowners end up redesigning a floor plan three months in because nobody checked the panel amperage on day one.
The conventional advice to “just call a contractor” undersells how much a proper feasibility visit protects you financially. A panel upgrade discovered in week one costs a phone call to an electrician. The same discovery made after permits are filed can mean redrawn plans and a new round of fees.
If there’s one thing worth prioritizing, it’s insisting on a written report, not a verbal impression. A builder who says “looks fine” after a fifteen-minute walk-through hasn’t given you anything to compare against a second opinion or hold anyone accountable to later. Ask for the buildable envelope sketch and the utility notes in writing before you sign anything else.
— Rudy
Ready to Schedule Your Site-Visit Assessment?
Live Large™ handles the ADU process the way this guide describes it should work: a real feasibility site visit first, then permit-ready plans, financing help, and turnkey construction, all under one roof instead of stitched together from separate vendors. That’s the practical advantage over piecing together a surveyor, a designer, and a contractor separately. One team already has the utility findings, the setback measurements, and the buildable envelope sketch before your design conversation even starts.
When you schedule a visit, expect a crew to walk your lot, check the panel and utility connections, and hand you written findings along with a realistic permit timeline for your jurisdiction, not a generic estimate. From there, you can move straight into financing options or explore ADU models sized to what your buildable envelope actually allows. Start by visiting the Live Large™ homeowner page to check availability and get your site-visit assessment on the calendar.
Sources
For local code specifics, check your city or county planning department’s GIS portal directly. The ADU feasibility study guide and ADU site plan guide both break down technical requirements in more depth, and photo galleries like Jackpot Landscaping’s project gallery show real examples of site access and grading challenges similar to what an ADU survey evaluates.
- ADU Site Plan Guide for Permit Applications
- Is Your Lot ADU-Ready? How to Perform a Site Feasibility Check – ADU Consulting
- ADU FEASIBILITY CHECKLIST | ConOwlProjects