
For most accessory dwelling units, the winning ADU bathroom design is a space-first layout: a curbless or three-quarter shower, wall-mounted or narrow-profile fixtures, and recessed storage instead of anything that eats floor area. This combination works because ADU footprints are small by definition and often need to double as a rental bathroom that survives heavy daily use.
Three moves to make before you sketch a single wall:
- Pick your footprint first (8×5, 6×8, or 5×7), and let it dictate fixture sizes, not the other way around.
- Consider a pocket or sliding door if the swing radius eats into your clearance.
- Convert a tub to a shower whenever the room is small in size.
Key Takeaways
A space-first ADU bathroom design combining a curbless or three-quarter shower, wall-mounted fixtures, and recessed storage gives most homeowners the best mix of usability, durability, and resale value.
| Point | Details |
|---|---|
| Footprint drives fixtures | Choose your 8×5, 6×8, or 5×7 layout before selecting fixture sizes, not after. |
| Wall-hung fixtures win floor space | Wall-mounted toilets and floating vanities expose floor and make a small room feel larger. |
| Recessed storage beats cabinets | Niches and recessed medicine cabinets add storage without narrowing walkways. |
| Ventilation follows a formula | Divide room volume by 7.5 to estimate required CFM, then round up to a standard fan size. |
| Live Large™ manages the full sequence | Live Large™ coordinates design, permitting, financing, and construction as one turnkey process for homeowners and investors. |
Table of Contents
- Layout Ideas and Footprint Examples for ADU Bathroom Design
- Space-Saving Fixtures That Hold Up to Daily Use
- Storage That Doesn’t Steal Floor Space
- Lighting and Mirror Tricks That Make a Small Bathroom Feel Bigger
- Clearances, Ventilation, and Accessibility Rules to Plan Around
- Where to Spend and Where to Save on ADU Bathroom Materials
- How Live Large™ Approaches ADU Bathroom Design
- Get a Custom ADU Bathroom Plan from Live Large™
- Sources
Layout Ideas and Footprint Examples for ADU Bathroom Design
Most ADU plans settle around three footprints: 8×5, 6×8, and 5×7. Each has its own logic, and picking the wrong one for your fixture list is the fastest way to end up with a bathroom that looks fine on paper and feels cramped in person.
An 8×5 layout is the closest thing to a standard in ADU construction. It typically fits a 30-inch vanity, a toilet, and either an acrylic tub/shower insert or a compact shower stall, and it’s common enough that many ADU floor plans are built around this exact box. A medium-sized layout gives you more room to run a linear layout along one wall, which keeps all your plumbing on a single stack and cuts installation cost. A smaller footprint usually forces a three-quarter bath (sink, toilet, shower, no tub) with a corner or neo-angle shower.
- Single-wall layouts put the toilet, vanity, and shower along one plane, minimizing pipe runs and simplifying the rough-in.
- Corner shower plans free up a diagonal sightline that makes a 5×7 room feel less boxed in.
- Wet-room configurations eliminate the shower threshold entirely, waterproofing the whole floor so water can’t pool anywhere.
Door choice matters more than people expect. A pocket door reclaims the swing radius a standard door demands, which in a 5×7 room can be the difference between a workable layout and a redesign. Contractor guidance on ADU floor plans flags ignoring door swing as one of the most common planning mistakes.
Pro Tip: Measure your door’s full swing radius and subtract it from your floorplan before you finalize fixture placement. It often forces the real decision between a pocket door and moving the vanity.
Space-Saving Fixtures That Hold Up to Daily Use
The fixtures you choose to determine whether a small bathroom reads as efficient or just small. Wall-hung toilets are the single biggest floor-space win available. They expose the floor beneath the tank, which both looks larger and makes cleaning easier, though they do require in-wall carriers that add some cost.
- Wall-hung or compact toilets: look for a 12 inch rough-in and confirm at least 21 inches of clearance in front for comfortable use.
- Floating vanities: run narrow, 18 to 24 inches wide, and expose floor space the same way a wall-hung toilet does. Koalaty Bath’s ADU layout guidance points to wall-mounted fixtures and curbless showers as the two most repeated recommendations in tight ADU plans.
- Shower systems: a curbless pan with a linear drain reads larger and is easier to access; a low-curb prefabricated pan is the budget-friendly middle ground.
- Tubs: still make sense in family-oriented ADUs with young children, but they rarely belong in a rental unit under 40 square feet.
For rental durability, spend on brass-bodied valves and quality cartridges. A $40 plastic valve that fails in year two costs more in labor than the $150 brass unit would have upfront.
Storage That Doesn’t Steal Floor Space
Recessed storage is the difference between a small bathroom that feels organized and one that feels cluttered no matter how clean it is. Every inch you carve into the wall is an inch you don’t lose to a cabinet swinging into the room.
- Shower niches work best when framed between existing plumbing studs, which avoids extra structural work and typically costs less than a custom build.
- Recessed medicine cabinets sit flush with the wall instead of protruding like a mirrored surface cabinet, a meaningful difference in a 5×7 room where every inch of walking space counts.
- Over-toilet shelving adds vertical storage without touching the floor plan at all.
- Deep pull-out drawers beat cabinet doors in narrow vanities, since a swinging door needs clearance a drawer doesn’t. Lowe’s small bathroom guidance makes this same case for tight layouts generally.
- Keep hardware finishes consistent throughout. Mixed metals in a small room create visual noise that makes the space feel busier than it is.
If your ADU needs built-in organization beyond what a standard vanity offers, a custom storage system can be worth the add for closets or linen storage adjacent to the bathroom.
Lighting and Mirror Tricks That Make a Small Bathroom Feel Bigger
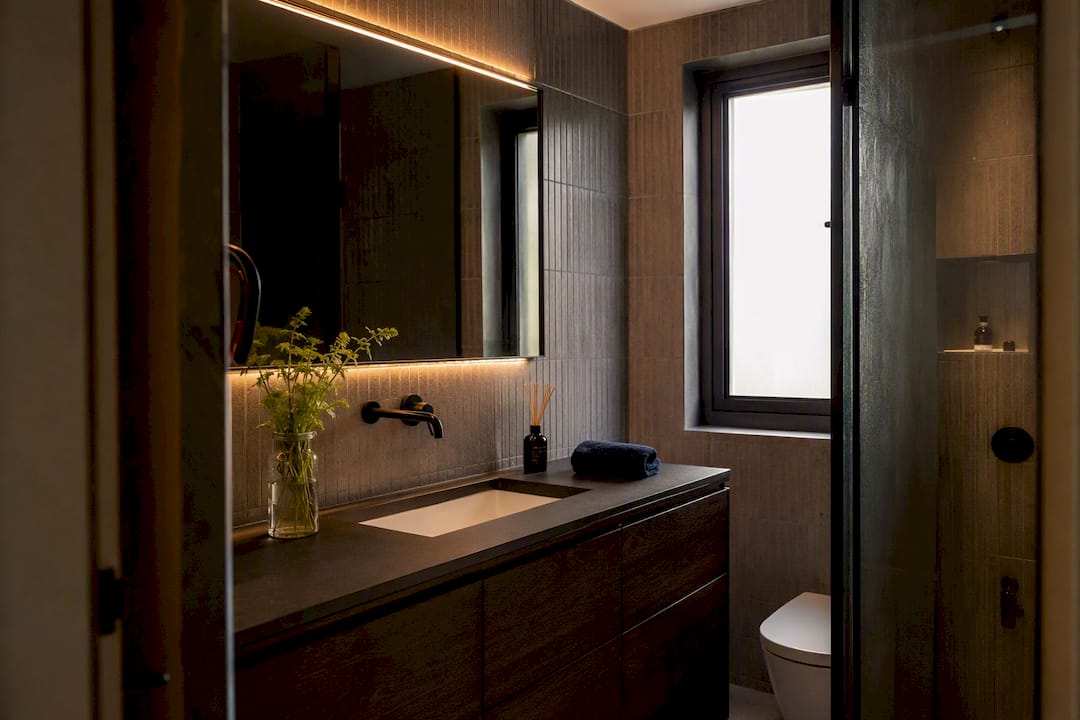
Light does more work in a small bathroom than almost any other single decision. A layered plan combining ambient ceiling light, task lighting at the mirror, and a small accent fixture reads brighter and larger than one overhead fixture ever will, particularly at 2700 to 3000K color temperature with a high CRI rating for accurate skin tones and true-to-life tile color.
Mirror size matters more than most homeowners realize: sizing it to roughly 70 to 80 percent of the vanity width creates the best visual balance, according to design guidance for tiny bathrooms. A full-width mirror can work in an 8×5 room where you want maximum light bounce.
- Run the same tile from the floor into the shower to eliminate a visual stop, a technique interior designers consistently recommend for small spaces.
- Choose frameless glass over a framed enclosure to preserve sightlines.
- Don’t fear a darker wall color if the lighting plan is strong. Paired with a light ceiling, a bold, saturated wall can actually increase perceived depth rather than shrinking the room.
Clearances, Ventilation, and Accessibility Rules to Plan Around
Building codes and basic usability rules aren’t optional extras. They’re the frame everything else in your ADU bathroom design has to fit inside. Most jurisdictions require roughly 21 to 30 inches of clear floor space in front of a toilet, tub, or shower, and about 15 inches from the toilet centerline to the nearest wall or fixture.
- Exhaust fan sizing: multiply room volume by ceiling height and divide by 7.5 to estimate the CFM you need. A typical 5×8 bathroom with 8 foot ceilings needs around 43 CFM, which most builders round up to a standard 50 CFM fan, per guest bathroom ventilation guidance.
- Add a timer switch so the fan keeps running after someone leaves the shower, which cuts down on trapped moisture and mildew.
- Build in blocking for future grab bars even if you don’t install them now. Retrofitting later means opening a finished wall.
- A curbless shower and comfort-height toilet cost little extra during construction and make the unit usable for aging residents or renters with mobility needs.
- Loop in a licensed plumber or your local building inspector before finalizing vent routing. Permit rejections over venting are common and expensive to fix after drywall goes up.
Where to Spend and Where to Save on ADU Bathroom Materials
Budget discipline in an ADU bathroom comes down to spending where failure is expensive and saving where it isn’t visible in five years.
- Invest in a curbless shower pan, quality valves, and large-format porcelain tile. These are the elements that fail expensively or look dated fast if you cut corners, and large-format tile with minimal grout lines reads as a bigger, more finished room.
- Save with prefabricated shower pans and vinyl plank flooring that mimics a continuous tile look at a fraction of the labor cost.
- Choose quartz over marble for vanity tops in rental ADUs. Quartz resists staining and needs no sealing, which matters when a tenant, not you, is doing the daily upkeep.
- Phase larger renovations if you’re upgrading an existing structure, tackling plumbing and waterproofing first, finishes second, to spread cost without leaving the unit unusable for weeks at a time.
How Live Large™ Approaches ADU Bathroom Design
Live Large™ runs every ADU bathroom through the same sequence: design, permitting, construction, and finish selection, with a licensed team checking the details that trip up DIY projects.
- Verify clearances against local code before finalizing the layout.
- Review the plumbing stack location to avoid costly relocation mid-build.
- Size ventilation to the room’s actual volume, not a generic assumption.
- Match finish selections to the main home’s style so the ADU feels intentional, not bolted on.
A guiding take on ADU bathroom priorities
Most ADU bathroom mistakes trace back to sequencing, not taste. Homeowners pick fixtures before checking clearance, then fight the layout backward. My rule: clearance first, storage second, finishes to match the main home last. That order avoids nearly every rework I’ve seen discussed in ADU planning guides. It’s also why many homeowners hand the whole sequence to a turnkey builder rather than juggling it themselves.
Pro Tip: Before you shop for a single fixture, tape off your actual clearance zones on the existing floor. It takes ten minutes and prevents the most expensive layout mistakes.
— Rudy
Get a Custom ADU Bathroom Plan from Live Large™
Live Large™ handles ADU bathroom design the way most homeowners wish they could handle it themselves: one team covering design, permitting, financing guidance including HELOC options, construction, and installation, so you’re not coordinating five separate contractors around a single small room. That matters most in a bathroom, where a clearance mistake or a botched vent run is expensive to unwind once the drywall is up.
If you’re weighing whether a full ADU project pencils out for your lot, start with a property analysis and consultation to see how a turnkey build compares to a piecemeal renovation. For homeowners who want the fuller picture on interior choices beyond the bathroom, Live Large™’s interior design guidance for small ADUs covers the same space-efficiency principles across the whole unit.