
Yes, you need a building permit to construct an accessory dwelling unit, and the first move is checking your property’s zoning and your city’s permit portal. From there, the ADU permit process runs eligibility check, design and documents, submittal, completeness review, plan check, corrections if needed, permit issuance, inspections, and finally occupancy. California homeowners should also decide early whether to file under the State ADU program or their local ordinance, and ask about pre-approved plans to cut weeks off review.
TL;DR:
- Most jurisdictions require multiple permits, including building, zoning, utility, and possibly coastal or historic permits, depending on site flags.
- The permit review process is legally mandated to take no more than 60 days once the application is deemed complete, but extra documentation or complex reviews can extend this timeline.
- Using pre-approved or standard plans can reduce review time by up to 30 days but limits design customization for unconventional sites.
- Complete and accurate documentation at initial submission, especially structural calculations and administrative forms, is critical to avoid costly delays and rejections.
- Allow 8 to 14 months from initial zoning check to final occupancy, factoring in design, review cycles, permits, inspections, and construction timeline.
Table of Contents
- How Do You Check Eligibility and Choose the Right Application Path?
- Which Permits and Approvals Does an ADU Actually Need?
- What Documents Do You Need to Submit an ADU Plan Set?
- How Do You Submit an ADU Permit Application Online?
- How Long Does ADU Permit Review Actually Take?
- What Do ADU Permit Fees and Utility Charges Actually Cost?
- How Do Inspections and Final Occupancy Work for an ADU?
- Are Pre-Approved ADU Plans Worth Using?
- What Mistakes Delay Most ADU Permits?
- Author’s Perspective: When to DIY and When to Hire a Design-Build Firm
- Can You Appeal a Denied or Delayed ADU Permit?
- How Do You Handle Local Variations in the ADU Permit Process?
- How Long Does the Entire ADU Permit Process Really Take?
- What Impact Fees Should You Budget for Beyond Basic Permits?
- How Live Large™ Handles ADU Permitting for Homeowners
- Sources
How Do You Check Eligibility and Choose the Right Application Path?
Before you draw a single wall, pull up your city’s zoning viewer and type in your address. Most jurisdictions post these tools online, and they’ll show your lot’s zone, overlay districts, and any flags for coastal, historic, or hillside review. Pair that with your county assessor’s parcel record to confirm lot size, existing structures, and setbacks. A guide to ADU setback requirements walks through the dimensional math most homeowners get wrong on a first pass.
In California, you’ll also choose between the State ADU program and your city’s Local ADU program. The State program is designed to be ministerial, meaning staff approve it against a checklist rather than sending it to a hearing or discretionary review. Local programs sometimes add extra design standards or require project applications and screening forms, but they can also offer in-house review paths that move faster for straightforward projects. San Francisco spells out both routes clearly, including pre-application steps for its Local program, like posting a public notice before submittal.
A few situations pull you off the standard path entirely:
- Coastal zones often require a separate Coastal Development Permit before or alongside your building permit.
- Historic districts may require a Certificate of Appropriateness from a design review board.
- Variance requests (for setback or height exceptions) trigger discretionary review, which takes longer and isn’t ministerial.
If your parcel doesn’t hit any of those flags, you’re likely looking at a straightforward, by-right approval once your plans are complete.
Which Permits and Approvals Does an ADU Actually Need?
Most homeowners assume “the permit” is one document. It’s usually several, and knowing which ones apply to your project keeps you from missing a step that stalls your final inspection.
- Building permit: required for any new ADU construction, whether detached, attached, or a garage conversion. Portland’s guidance notes that new construction and major alterations require a long-form building permit, while smaller trade-specific work sometimes qualifies for an expedited “quick” permit instead.
- Zoning permit or clearance: confirms your ADU meets setback, height, and lot coverage rules before the building permit moves forward.
- Sewer use and drainage permit (SUDP): Denver requires this alongside zoning and building permits for ADUs, and uploading all required documents together can let reviewers process everything simultaneously instead of in sequence.
- Coastal Development Permit: required in coastal overlay zones, as San Diego’s Information Bulletin 400 details.
- Trade permits: electrical, plumbing, and mechanical work often get pulled as separate “quick” permits, sometimes by your contractor mid-project rather than at initial submittal.
Utility connections are a separate animal. If your ADU adds a new water meter or taps into an existing sewer lateral beyond its rated capacity, expect a distinct utility application and connection fee on top of your building permit.
What Documents Do You Need to Submit an ADU Plan Set?
Cities reject far more first-round submittals for missing paperwork than for design problems. Boston’s ISD process, for example, walks applicants through apply, completeness review, plan check, corrections, and issuance, and incomplete document sets are the most common reason projects get bounced back at step one.
Build your submittal package in this order:
- Site plan showing lot lines, setbacks, existing structures, and the ADU’s footprint.
- Floor plans for every level, with room dimensions and door/window locations.
- Elevations on all four sides, showing height and roof pitch.
- Foundation plan with footing details.
- Structural calculations, stamped by a licensed engineer for anything beyond a simple slab-on-grade design.
- Framing and shear wall details for seismic and wind load compliance.
- Title 24 energy compliance forms (California) or your local equivalent, plus plumbing and mechanical schedules.
- Manufacturer cut sheets for prefab components, windows, or HVAC equipment.
- Administrative forms: authorized agent designation, ADU screening form, project application, and utility data cards.
Format matters as much as content. Every sheet needs a clear sheet index, a stated scale, a north arrow, and dimension callouts a plan checker can verify without guessing. A breakdown of ADU floor plans shows how these sheets typically map to the plan sets cities expect.
Pro Tip: Submit stamped structural calculations and signed administrative forms with your first submittal, not as an afterthought. A complete package on day one starts your jurisdiction’s statutory review clock immediately, while a partial one just gets you a completeness rejection and a restart.
How Do You Submit an ADU Permit Application Online?
Nearly every major city has moved ADU applications to a digital portal, and each one works a little differently.
- PermitSF handles San Francisco’s ADU applications, including Local program pre-application notices and status tracking.
- San Diego’s Development Services Portal manages submittals under Information Bulletin 400, including preapproved plan applications.
- EPIC-LA and the BSOP web application cover Los Angeles County permitting, letting applicants upload plan sets and track review comments.
- Seattle’s e-permits system works alongside ADUniverse for standard DADU plan submittals.
- Denver’s e-permit portal allows simultaneous upload of building, zoning, and SUDP documents.
Before you submit anything, create your account and add any authorized agent, whether that’s your architect, contractor, or a design-build firm handling permitting on your behalf. Owner-builder rules vary by jurisdiction. Some cities let you self-permit with a signed affidavit; others require proof of a licensed contractor’s registration and insurance before they’ll issue anything beyond a basic permit.
Once submitted, staff run a completeness review checking for missing signatures, absent structural stamps, or plan sheets that don’t match the application form. Catching these gaps yourself before submittal saves a resubmittal cycle.
How Long Does ADU Permit Review Actually Take?
California law sets real deadlines, not just guidance. Jurisdictions must confirm application completeness within 15 business days, and once an ADU or JADU application is deemed complete, they must approve or deny it within 60 days. That’s the statutory floor, and it applies whether you’re in a small county or a dense city.
Pre-approved plans can shave up to 30 days off standard review timelines in jurisdictions that offer them, according to county permitting guidance.
Permit Review Roundtables, where city staff from planning, building, and utilities departments meet jointly on a project, also compress timelines by resolving conflicting comments in one sitting instead of three separate rounds of email.
Not every project hits the 60-day mark, though. Seismic retrofits, structural variances, or a Certificate of Appropriateness in a historic district all add review layers the statutory clock doesn’t shortcut. And if your ADU is bundled into a larger new-construction package, like adding a second unit alongside a major remodel, you may lose the ADU-specific expedited timeline entirely and fall into standard discretionary review instead.
What Do ADU Permit Fees and Utility Charges Actually Cost?
Permit fees rarely show up as one line item. Budget for several categories that stack on top of each other.
- Filing fee: due at submittal, usually a flat rate regardless of project size.
- Plan-check fee: often calculated as a percentage of estimated construction valuation.
- Issuance fee: charged when the permit is actually granted, separate from the plan-check cost.
- Sewer capacity or utility connection charge: a one-time fee tied to adding a new dwelling unit’s demand on the sewer or water system.
That sewer capacity charge is the one homeowners most often miss in early budgeting. It’s not listed alongside standard permit fees, and it varies significantly by utility district. Call your local water or sewer authority directly and ask for a written estimate before you finalize your construction budget, and build in a contingency line for whatever they quote.
How Do Inspections and Final Occupancy Work for an ADU?
Inspections follow a fixed order for good reason: each one verifies work that gets covered up by the next phase. Expect foundation inspection first, then framing, then rough trades (electrical, plumbing, mechanical before drywall goes up), then insulation and energy compliance, and finally the closeout inspection that clears occupancy.
Coordinating trade inspections early avoids the most common source of final-day delays. Treating your permits as a linked stack of approvals, not isolated paperwork, means scheduling your electrician’s rough inspection before drywall crews show up, not after.
Keep a physical or digital folder of every inspection approval and correction notice. Inspectors ask for prior sign-offs, and a missing record can force a re-inspection of work that already passed.
The most common final inspection failures are avoidable: missing smoke and carbon monoxide detectors, an unlabeled electrical panel, address numbers not visible from the street, and egress windows that don’t meet minimum clear opening size. Walk your unit against a basic checklist before you call for final.
Are Pre-Approved ADU Plans Worth Using?
Pre-approved plan sets are architectural designs a city or county has already reviewed and cleared for structural and code compliance, so any homeowner can pull one from the library instead of commissioning custom drawings. Seattle’s ADUniverse is the clearest example, offering pre-vetted detached ADU designs that Seattle reports processing in 2 to 6 weeks when homeowners use standard plans with all required documents attached. San Diego runs a similar program under AB 1332, with qualifying applications reviewed in 30 days.
The trade-off is customization. You’re picking from a fixed catalog of layouts and square footages, and licensing a pre-approved plan usually carries an upfront cost. That said, licensing a plan often lowers your plan-check fees and cuts review rounds compared to a fully custom design.
- Use a pre-approved plan if your lot is standard-shaped and you don’t need an unusual layout.
- Go custom if your site has slope, tight setbacks, or you want a specific interior configuration.
Pro Tip: Even with a pre-approved plan, budget time to adapt the foundation design to your actual soil conditions. A geotechnical report can add a review cycle even on an otherwise pre-cleared design.
What Mistakes Delay Most ADU Permits?
Reviewers see the same handful of errors on repeat, and every one of them is preventable.
- Incomplete Title 24 or energy compliance forms. Missing calculations here are one of the top reasons for a completeness rejection, not just a plan-check comment.
- Site plan errors, like a setback measured from the wrong property line or a footprint that doesn’t match the floor plan dimensions.
- Mismatched drawings across sheets, where the elevation shows a window the floor plan doesn’t.
- Uncoordinated trade work, where an electrician’s rough-in doesn’t match what the plumbing plan shows, causing a failed inspection later in the project.
- Assuming an unrelated code violation on the property blocks ADU approval. It sometimes doesn’t. Call planning staff directly and ask whether the existing issue affects your specific application before you assume the worst.
Author’s Perspective: When to DIY and When to Hire a Design-Build Firm
Three signals tell you it’s time to hire a pro instead of self-permitting: your lot has any coastal, historic, or hillside flag; you need structural calculations stamped by an engineer; or you’re already juggling a full-time job and can’t spend hours tracking plan-check comments. None of that is a knock on capable homeowners. It’s just math on your time.
Budget for a 10 to 15% contingency above your contractor’s estimate before you file anything. Bring three things to your first consultation: your parcel address, any existing site survey, and your target ADU size and budget range. Consider a look at when hiring an architect actually pays for itself versus when it doesn’t.
— Rudy
Can You Appeal a Denied or Delayed ADU Permit?
Most jurisdictions build in a formal appeals process for ministerial denials, and it’s worth using rather than resubmitting blind. If your ADU application gets denied under the State program, the denial should come with a specific list of code sections the plans failed to meet. That list is your roadmap. Correcting those exact items and resubmitting is usually faster than an appeal, since ministerial reviews don’t involve subjective judgment calls you’d need to contest.
Discretionary denials, like a rejected variance or a Certificate of Appropriateness turned down by a historic review board, work differently. These typically have a formal appeal hearing before a planning commission or zoning board, with a filing window that’s often just 10 to 15 calendar days from the denial notice. Missing that window usually means starting the discretionary process over.
Delays are a separate problem from denials, and they call for a different move. If your jurisdiction blows past the 60-day statutory approval window for a complete ADU application, contact the permit center supervisor directly and reference the state-mandated timeline. Many delays trace back to a single missing signature or an assigned reviewer who’s out on leave, and a direct call resolves what a resubmittal wouldn’t fix anyway. Document every submission date and every comment letter you receive, since that record is what you’d need if you ever had to escalate formally.
How Do You Handle Local Variations in the ADU Permit Process?
No two cities run this process identically, and that’s the single biggest source of homeowner frustration. A neighbor’s ADU timeline in a different county tells you almost nothing about yours.
Start every project by reading your specific city’s ADU ordinance page rather than relying on general advice you found online. Portland’s ADU regulations differ meaningfully from San Diego’s, and San Diego’s differ from Los Angeles County’s EPIC-LA process, even though all three are ostensibly following the same state framework in California.
Pay attention to three variables that shift most between jurisdictions: whether your city requires a separate project application on top of the State program forms, whether trade permits get pulled concurrently or sequentially, and whether your zone has an overlay (coastal, historic, hillside) that adds a discretionary layer. A quick call to your planning counter, or better, a scheduled pre-application meeting, answers all three faster than searching city code yourself.
If your project sits near a jurisdictional boundary or involves a hillside lot, ask specifically about grading and drainage rules, since these vary block to block in some cities and rarely show up in general ADU guides. The 2026 Los Angeles ADU report from Blackbriar covers hillside-specific permitting quirks that catch a lot of Southern California homeowners off guard.
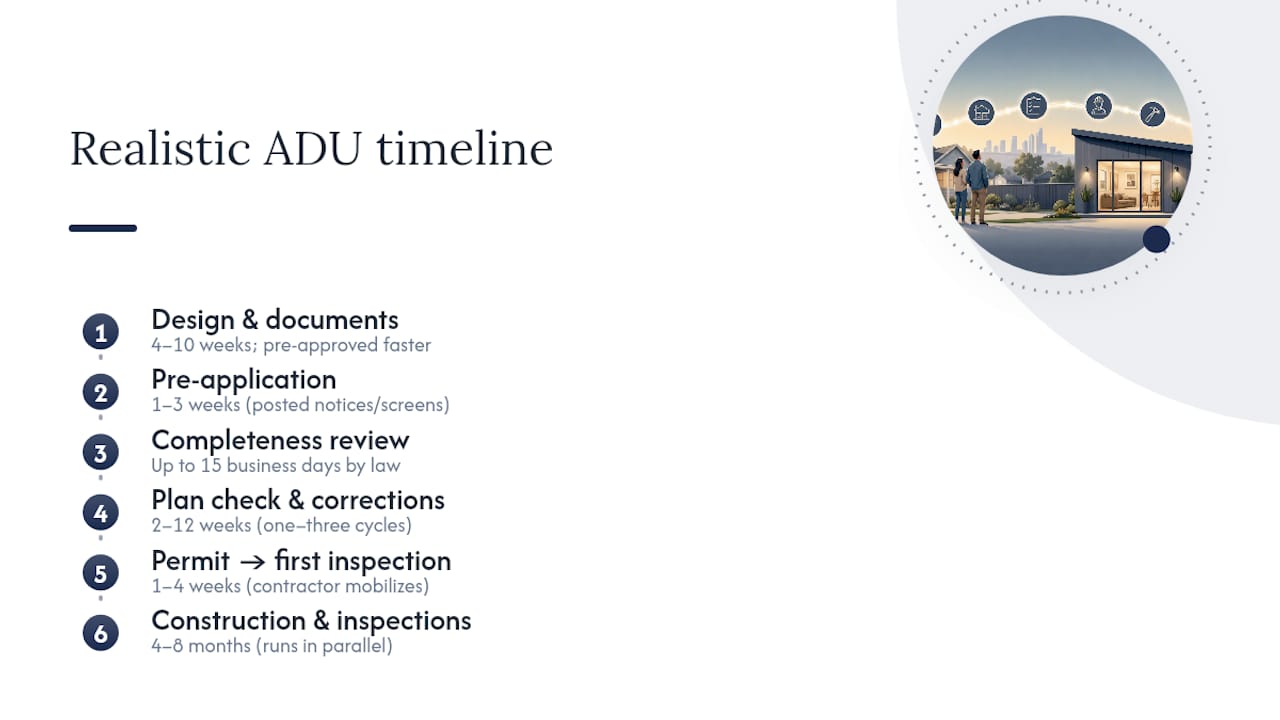
How Long Does the Entire ADU Permit Process Really Take?
The 60-day statutory window covers only the review-and-decision phase, not everything before and after it. Here’s a more realistic breakdown of full project timing.
Design and document prep: 4 to 10 weeks, depending on whether you’re using a pre-approved plan (faster) or a fully custom design requiring an architect and structural engineer (slower).
Pre-application steps: 1 to 3 weeks for jurisdictions requiring posted notices or screening forms, as San Francisco’s Local program does.
Completeness review: up to 15 business days by law, though a clean first submittal often clears faster.
Plan check and corrections: this is where projects stretch. One correction cycle can add 2 to 4 weeks; two or three cycles, which happen more often than homeowners expect, can add 2 to 3 months total.
Permit issuance to first inspection: 1 to 4 weeks, depending on how quickly your contractor mobilizes.
Construction and inspections: typically 4 to 8 months for a detached ADU, running in parallel with, not after, your permit’s active status.
Add it up and a realistic total, from first zoning check to final occupancy, runs 8 to 14 months for most detached ADU projects. Pre-approved plans and a clean first submittal push you toward the shorter end.
What Impact Fees Should You Budget for Beyond Basic Permits?
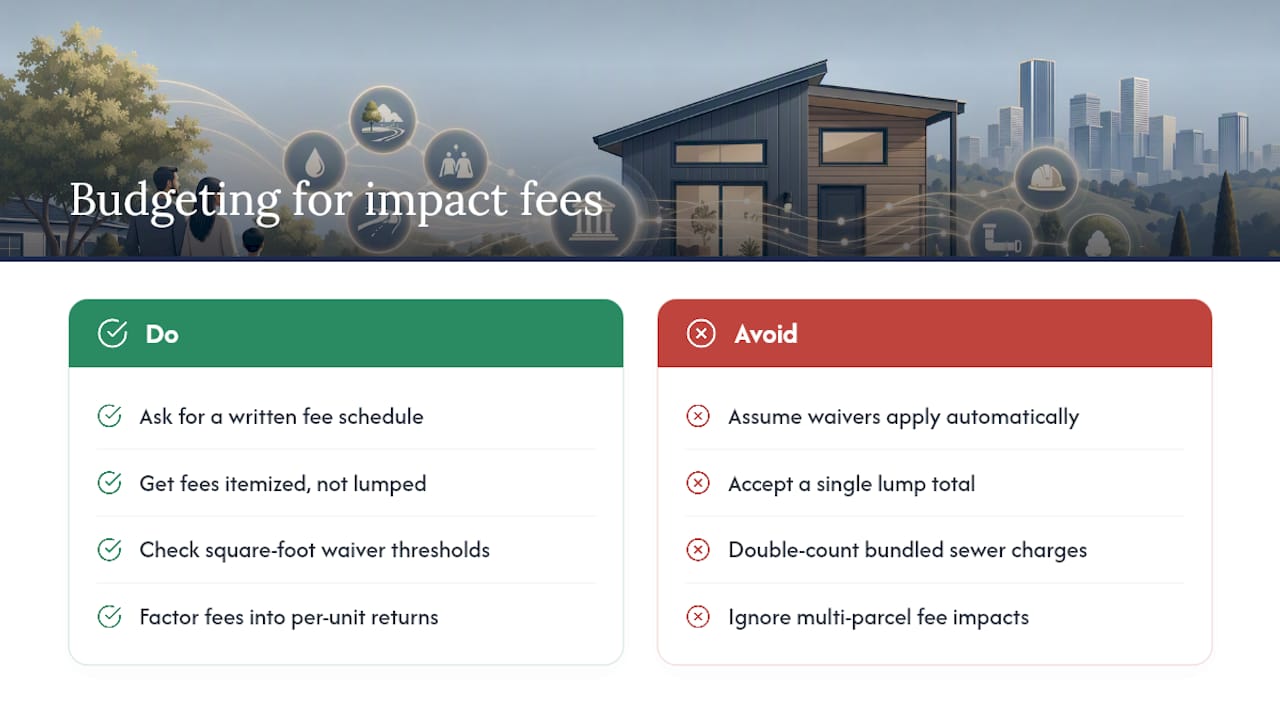
Impact fees are separate from your building permit fee, and they fund the infrastructure your new unit adds demand to: schools, parks, roads, and utility capacity. Some California jurisdictions waive impact fees for ADUs under 750 square feet, but that waiver isn’t universal, and it doesn’t apply automatically everywhere in the state or in other markets.
Ask your permit office for a written impact fee schedule before you finalize your budget, not after. These fees are frequently calculated per square foot above a threshold, which means a modest size increase in your design can trigger a jump in what you owe. A 750 square foot ADU might sit right at a waiver line, while an 800 square foot version of the same design could add thousands of dollars in fees that weren’t part of your original estimate.
Sewer capacity charges, discussed earlier as a utility cost, sometimes get bundled into a broader “development impact fee” category depending on the city, which makes it easy to double count or completely miss one line item. When you get your fee estimate, ask the permit staff to itemize each charge separately rather than accepting a single lump total, so you know exactly what’s covered.
For investors building multiple units across several parcels, impact fees can meaningfully change project economics at scale, and it’s worth factoring them into per-unit return calculations rather than treating them as a rounding error on a single build.
How Live Large™ Handles ADU Permitting for Homeowners
Permitting is the part of this process most homeowners underestimate, and it’s where Live Large™ spends most of its effort on a client’s behalf. Live Large™ handles design, permit submittal, financing guidance (including HELOC assistance for homeowners), and turnkey construction and installation, so the plan-check corrections and portal logins become someone else’s job instead of yours.

If you want a sense of how this works city by city, there are guides like the San Diego ADU permit walkthrough and resources on turnkey ADU development that lay out what a full-service build actually looks like from first consultation to final inspection.
Before a first consultation, have three things ready: your parcel address, any existing site plan or survey, and a rough sense of your target ADU size and budget range. From there, it is possible to quickly determine whether your lot qualifies for a streamlined path or needs a more custom approach, helping to start the permitting clock moving in your favor instead of against you.
Sources
- ACCESSORY DWELLING UNIT (ADU) INFORMATION — San Bernardino County LUS (handout)
- Sf
- Accessory Dwelling Unit/Junior Accessory Dwelling Unit | City of San Diego
- Seattle
- Portland ADU residential permitting — permit types